|
Please have a professional motorcycle technician prep your scooter. Your warranty will only cover you if you have this done. It's not hard to do yourself if you are comfortable with tools and small engine mechanics.
Assembly - Print this and give it to your professional to use as the step-by-step instructions
You have purchased a new motor scooter, which is not a toy. These scooters are made in China where scooters are a way of life for many people. A scooter may be the only transportation a person has, so they take great care in manufacturing. If you were to buy a scooter locally, you would pay twice the price, plus pay a set-up fee to have a professional assemble your scooter and adjust it properly. You got a great price on a brand new motor scooter which will last a very long time if you follow the manufacturers break-in instructions and maintenance schedule. We would really like to see our customers pay $50-$75 to have a professional assemble your new scooter to be sure it runs perfectly. If you choose to assemble your scooter yourself, you are responsible for making sure your scooter is road worthy and safe. And you will NOT Have a warranty. The carburetor may require some adjustment to get your scooter running perfect. This is best done by a professional.
The reason your carburetor many need adjusting is simple:
- your altitude above sea level may be different than the manufacturers,
- because the scooter has been sitting in a ship for a few weeks, then customs, and our warehouse it may have old gas that needs to be flushed out, and
- after the engine is broken in, the idle will need to be set properly.
Do not void your warranty by not breaking in your scooter correctly. Please read your owners manual and follow it carefully.
Before starting, please read our disclaimer page, it contains important information about the operation and ownership of your new scooter. The following instructions assume that you have some mechanical abilities and general motorcycle knowledge. These are just general instructions, you should have a motorcycle shop do the set-up. Most motorcycle or lawn mover repair centers will be able to help you for a small fee. The average is $50. Be careful moving around the crate, it weighs 210 pounds, so get some help!
Tools & Supplies Needed:
- Claw hammer
- 10mm wrench
- Wire cutters
- Eye protection
- Gloves
- Long sleeve shirt
- Razor knife
- 2 pints of 2 cycle oil (for 2 stroke engines only)
- 1.5 gallons of unleaded fuel, 90 octane or better.
- 300ml clean container to hold oil
- Small funnel
- Flat head and Phillips screw drivers
- Some friends to help and the thing between your ears!
Assembly Of Your New Scooter:
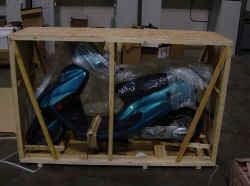
Wear gloves and eye protection at all times during assembly. Before uncrating the scooter or opening the crate, please check the crate for external damage. If the crate is damaged in anyway, STOP, and call our customer service department to file a claim with the shipping company. The shipping company will want to see the crate as it was delivered, so do not open it! We insure all shipments and when they leave our warehouse they are not damaged in anyway. We do not guarantee the shipment, the shipping company is responsible for that part of the sale process. Once you are sure the crate is in perfect condition, use the following steps to uncrate your scooter:
- Uncrate the scooter:
- remove the cardboard box from around the wood frame crate.
- remove all the angle support boards with a claw hammer. Be careful with the nails and pick them up as you go.
- Now cut the three wires holding the scooter in place. There are two on the luggage rack and one on the left handle bar grip.
- Clip the tie wrap on the left hand brake. (this is holding the rear brake in the lock position)
- Remove two 10mm nuts on the board holding the footrest in place.
- Remove the foot brace or move it aside. Be careful not to scratch the scooter with the wires or bolts.
- Now remove the center support boards with a claw hammer.
- Now remove the top and sides with a claw hammer.
- Now you should be able to remove the scooter. Get some help, it's heavy!
- Remove everything from under the seat
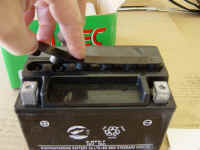
- Battery installation
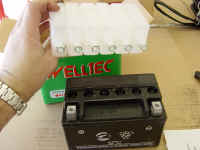
Be careful not to touch the battery chemicals. Use gloves, wear a long sleeve shirt and wear eye protection.
- Remove the battery and electrolyte from the box.
- Remove the red tape from the battery.
- Carefully remove the black plastic top on the electrolyte and save the top. (it will be used to seal the battery later)
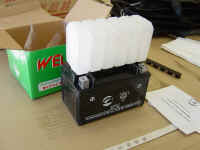
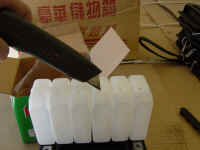
- Flip the bottles of electrolyte over and sit each bottle over the top of the battery hole. Now push down on the bottles and the battery will break the aluminum foil. Use a razor knife to make air holes in the bottles.
- Let the fluid completely drain into the battery.
- Use the black lid to seal the battery.
- Allow the battery to sit for 6 minutes before charging it with a 0.7 amp charger for 5 hours.
- The battery will either install under the floor mat or under the seat, depending on the model.
- Using the nuts and bolts from the battery box, install the two (2) positive connections to the positive side of the battery and the one (1) black wire to the ground. Install the wires on top, if they will not slide in the side.
- Place the battery and replace the cover. If screws are used to hold the cover in place, they are in a plastic bag that was under the seat.
- Dispose of the empty fluid bottle properly.
- Fuel and oil
- Put 5 oz. of 2 stroke oil in each tank of gas for the first 1000 miles!
- For 2 cycle scooters, remove the black oil cap under the seat (or on the right side of the Retro 21) and fill it up with 2 cycle motor oil. It holds a lot of oil, so fill it up. If you don't fill it all the way up, a buzzer may sound to let you know you are low on 2 cycle oil.
- Fill up the gas tank with unleaded fuel. Make sure that the cap is installed properly before operating. Check for leaks before operating. It's uncommon, but hoses can come lose during shipping from China. All you need to do it check for leaks and make sure the lines are attached good. Call us if you have any leaks you can't figure it out in a few minutes. We're here to help!
- The transfer case on the lower left takes 300 ml for 10W-30 for 2-stroke and 100 ml of 10W-30 oil for 4-stroke. Do not over fill this or you will void the warranty! The scooters are shipped with oil, but the oil may have leaked during shipping. To be sure you have enough oil, drain it into a clean container and refill. Make sure you have at least the required amount of oil; a little more is fine. In most cases, we have found more oil than this, so just fill it back up with what it had. If you need to add oil, use 10W-30 motor oil and Do not over fill.
- For 4 cycle only, check the crank case oil on the right hand side. It takes 10W-30. Clean the dip stick off and check it for oil. If it is low, fill it until the dip stick shows it to be full. Do not over fill.
HOT TIP - We have had 4 EuroSport, Retro and Sport's with kinked oil lines going into the oil injector. STOP and make sure your scooter is getting oil properly. You should see smoke coming out of the tail pipe. If you do not, please have a professional check your oil pump and make sure the line coming from the tank to the pump is not kinked. Not doing this could ruin a piston and you'll be without your scooter while you have someone repair it. So it's easier to check this and fix it now. If you need further info, contact us.
Warning: Never start a motor vehicle in an enclosed area. Always allow for plenty of ventilation. The fumes could be harmful or even cause death.
- Starting
- The kick-start is the only way we have found to start the bikes initially.
- Place the scooter on the center stand, not the side stand.
- Some scooters have an electric choke. If not, you will need to choke the scooter while starting.
- Do not give too much gas and keep pumping the kick starter!
- It will take anywhere from 2 - 10 minutes to start the first time. But once it starts, it will run fine and start fine with the electric starter button.
- Adjustments and advice before riding
- Check the tire pressure. You should run 36 psi (cold) in the front and rear.
- Check the movement of everything. Also check all of the bolts to be sure they are tight. You should check the bolts after a few hundred miles of use to be sure they have not worked lose.
- Adjust the brakes if needed. Make sure the brakes work before riding.
- Test the lights and turn signals.
- Read the manual if included. The manual gives you good advice on riding and maintaining your scooter, including your break-in procedure and periods. Also familiarize yourself with the controls before riding.
- Some carburetors require adjusting. This is best done by someone with small engine mechanical experience. If the scooter doesn't idle very well, this is easy to fix by turning the idle screw on the carburetor. Do not attempt if you are not sure how it works.
Read the Carburetor Adjustment Procedure.
- Take it easy for the first few hundred miles. Statistics show that most accidents happen within the first few hundred miles. So take it easy! We also recommend you take a class on motor scooter riding. This might save your life!
- Loaning your scooter to a friend may sound like a great idea, but many accidents happen this way, so think before you loan.
- Have fun and remember to send your friends to us. We will pay any past customer $25 for any customer they send to us that buys a scooter from us for retail (not Ebay or sale prices).
In all cases, please call our customer service department if you have any questions or concerns. We want our customers to be safe and have fun!
|